Building a Vector Index in Azure AI Search: HNSW, Profiles, and RAG Retrieval
In this article, we will understand how vector search works in Azure AI Search and how to use it as the retrieval layer in a Retrieval-Augmented Generation (RAG) system. The article is meant for software engineers. We will not stop at theory. We will build a small, working example that you can run on your own machine and follow along step by step.
By the end, you will have a small document search service that takes a user question, finds the most relevant text using vector similarity, and prepares the context that you can pass to a language model.
Please note that Azure AI Search was earlier called Azure Cognitive Search. The service was renamed, but many older articles and code samples still use the old name. The concepts are the same.
Let us begin.
What is a RAG system, in short
A RAG system has two main parts. The first part is retrieval. When a user asks a question, we search a knowledge base and pull out the most relevant pieces of text. The second part is generation. We pass these pieces of text, along with the question, to a language model so that the model can answer using real, grounded information.
The quality of a RAG system depends heavily on the retrieval part. If retrieval returns the wrong text, the language model will produce a wrong or vague answer. This is the reason vector search matters. It allows us to retrieve text based on meaning, not only on keyword matching.
Why we need vector search
Traditional keyword search matches exact words. If the user searches for "car" and the document says "automobile", a keyword search may miss it. Vector search solves this problem.
In vector search, we first convert each piece of text into a list of numbers called an embedding. Texts with similar meaning produce embeddings that are close to each other in vector space. When a user asks a question, we convert the question into an embedding as well, and then we find the stored embeddings that are nearest to it. This is called nearest neighbour search.
Azure AI Search supports this by allowing you to define a vector field in your index. You store the embedding in this field, and the service builds a structure that can search through many vectors quickly.
How Azure AI Search performs vector search
Azure AI Search supports two algorithms for vector search. The first is HNSW (Hierarchical Navigable Small World), which is an approximate nearest neighbour (ANN) algorithm. It is fast and is the recommended choice for most production workloads. The second is exhaustive KNN, which compares the query against every stored vector. It is exact but slower, and it is mainly useful for small data sets or for measuring the accuracy of the approximate method.
The following table compares the two algorithms.
| Algorithm | Type | Speed on large data | Recall | Best suited for |
|---|---|---|---|---|
| HNSW | Approximate (ANN) | Fast | Very high and tunable | Most production workloads and large indexes |
| Exhaustive KNN | Exact | Slow on large data | Exact (100 percent) | Small data sets or measuring ground-truth accuracy |
In Azure AI Search, the algorithm is not attached directly to a field. Instead, you define a vector search configuration that contains a list of algorithms and a list of profiles. A profile gives a name to a chosen algorithm. Each vector field then refers to a profile by its name. This extra layer makes it easy to reuse the same algorithm settings across several fields.
The vector field itself uses the type Collection(Edm.Single), which is a collection of single-precision floating point numbers. You must set the number of dimensions on this field, and this number must match the output size of your embedding model.
The architecture of our RAG system
Before writing code, let us look at the full picture. There are two paths. The ingestion path runs once (or whenever your data changes) and fills the index. The query path runs every time a user asks a question.
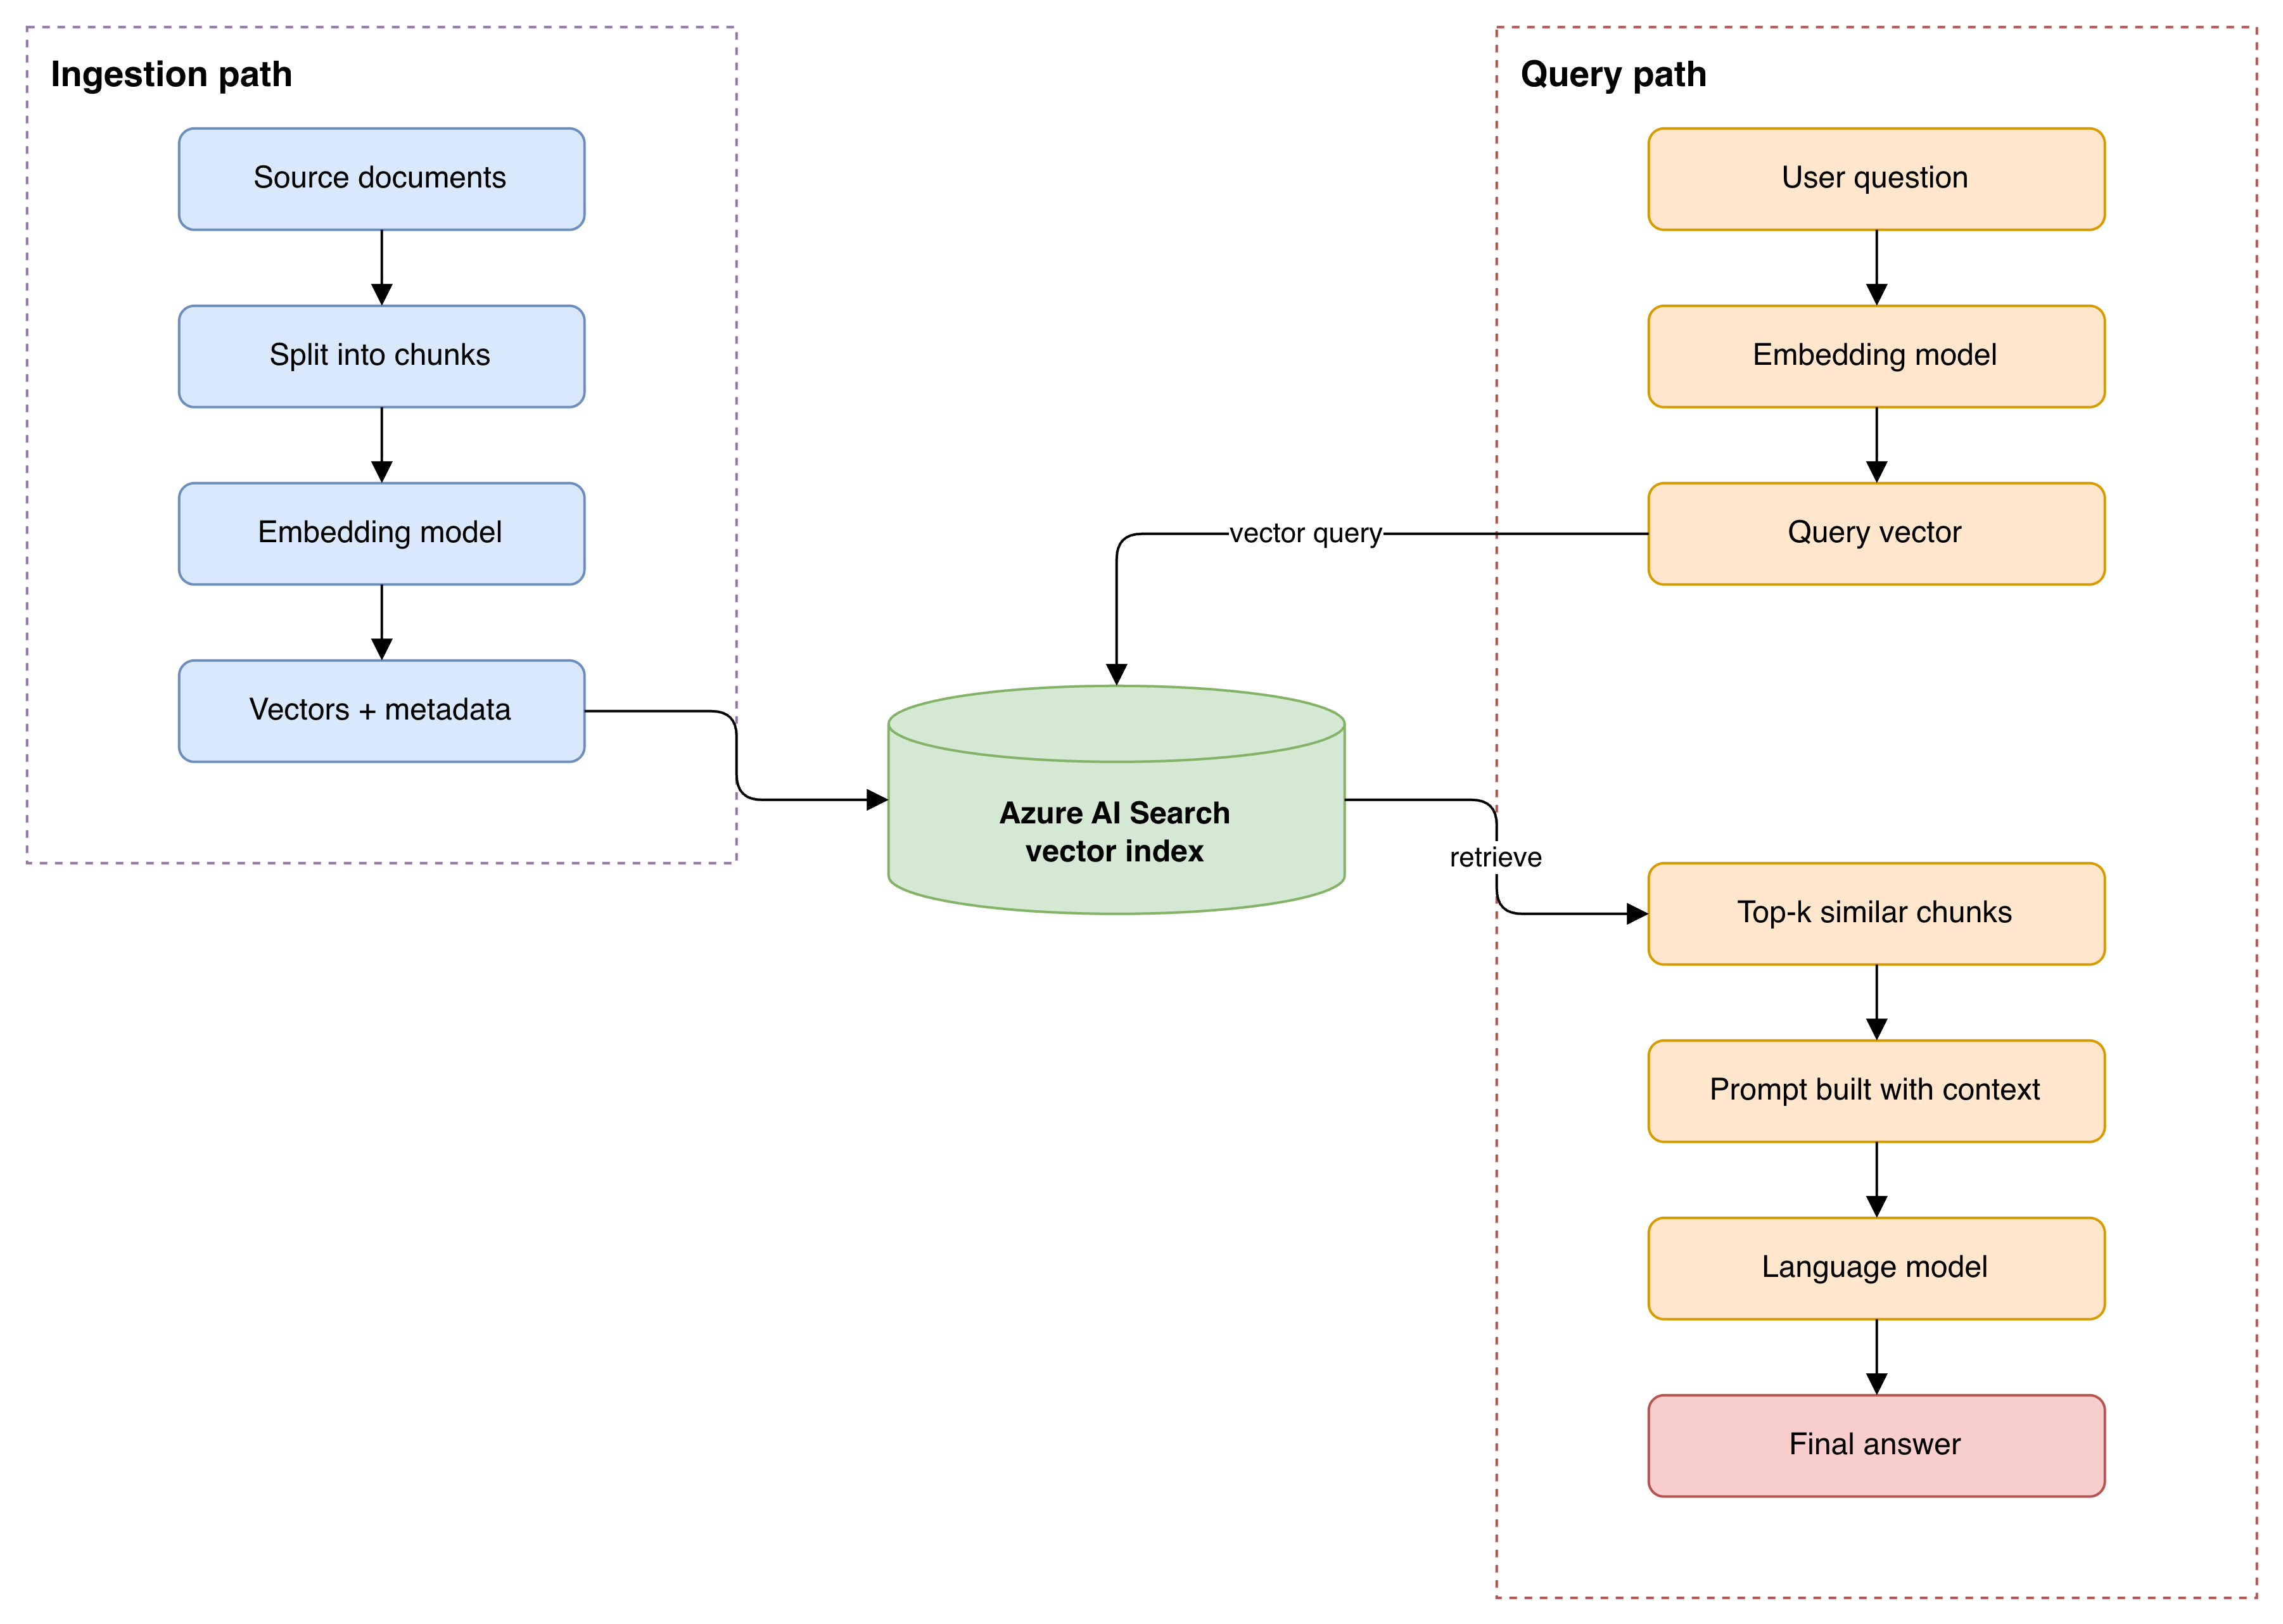
Please note one important detail. The same embedding model must be used in both paths. If you embed your documents with one model and your queries with another, the vectors will not be comparable, and the search results will be meaningless.
The data model
When we store a document for RAG, we usually do not store the full document as one record. We split it into smaller chunks, because a smaller chunk gives more focused retrieval and fits better inside the language model prompt. Each chunk becomes one document in the Azure AI Search index, and each document holds the chunk text, its embedding, and some metadata for tracing the result back to its source.
The following entity relationship diagram shows how a source document relates to chunks, and how each chunk is stored as one search document in the index.

In our small example, our documents are already short, so we will treat each document as a single chunk. In a real system you would add a chunking step, but the structure of the index will remain the same.
Hands-on tutorial
Now we will build the system. I am assuming you have an Azure subscription, Python (version 3.9 or above), and basic familiarity with running Python scripts.
We will create the embeddings on our own machine using a small open model, so that you do not need to set up an Azure OpenAI deployment to follow along. I will explain at the end how to switch to Azure OpenAI embeddings if you prefer.
Step 1: Create an Azure AI Search service
In the Azure portal, create a resource of type "Azure AI Search". The free tier is enough for this tutorial. After the service is created, open it and note down two values from the portal. The first is the service endpoint, which looks like https://<your-service>.search.windows.net. The second is an admin key, which you will find under the "Keys" section. We will use these in our code.
Please keep the admin key secret. In a real project, you would store it in an environment variable or in Azure Key Vault, not in the source code.
Step 2: Install the Python libraries
pip install azure-search-documents sentence-transformersStep 3: Create the vector index
Now we create an index that has a vector field. We define the field, the vector search configuration (the algorithm and the profile), and then we create the index.
from azure.core.credentials import AzureKeyCredential
from azure.search.documents.indexes import SearchIndexClient
from azure.search.documents.indexes.models import (
    SearchIndex,
    SimpleField,
    SearchableField,
    SearchField,
    SearchFieldDataType,
    VectorSearch,
    HnswAlgorithmConfiguration,
    HnswParameters,
    VectorSearchProfile,
)

endpoint = "https://<your-service>.search.windows.net"
admin_key = "<your-admin-key>"
index_name = "rag-docs"

index_client = SearchIndexClient(
    endpoint=endpoint,
    credential=AzureKeyCredential(admin_key),
)

# 1. Define the fields. The embedding field is the vector field.
fields = [
    SimpleField(name="doc_id", type=SearchFieldDataType.String, key=True, filterable=True),
    SearchableField(name="text", type=SearchFieldDataType.String),
    SimpleField(name="source", type=SearchFieldDataType.String, filterable=True),
    SearchField(
        name="embedding",
        type=SearchFieldDataType.Collection(SearchFieldDataType.Single),
        searchable=True,
        vector_search_dimensions=384,             # must match the embedding model
        vector_search_profile_name="my-vector-profile",
    ),
]

# 2. Define the vector search configuration: one algorithm and one profile.
vector_search = VectorSearch(
    algorithms=[
        HnswAlgorithmConfiguration(
            name="my-hnsw",
            parameters=HnswParameters(
                m=4,
                ef_construction=400,
                ef_search=500,
                metric="cosine",
            ),
        )
    ],
    profiles=[
        VectorSearchProfile(
            name="my-vector-profile",
            algorithm_configuration_name="my-hnsw",
        )
    ],
)

# 3. Create (or update) the index.
index = SearchIndex(name=index_name, fields=fields, vector_search=vector_search)
index_client.create_or_update_index(index)
print("Index created:", index_name)
Let me explain the choices here. The vector_search_dimensions is 384 because that is the output size of the embedding model we will use. The vector field points to a profile named my-vector-profile, and that profile points to the HNSW algorithm named my-hnsw. The metric is cosine, which is a common choice for text embeddings.
The next table explains the HNSW parameters and their default values in Azure AI Search.
| Parameter | Where it is set | What it controls | Default and range |
|---|---|---|---|
m | Algorithm configuration | Number of bi-directional links each node keeps in the graph | Default 4, range 4 to 10 |
efConstruction | Algorithm configuration | Number of candidate neighbours examined while building the graph | Default 400, range 100 to 1000 |
efSearch | Algorithm configuration | Number of candidate neighbours examined during a query | Default 500, range 100 to 1000 |
metric | Algorithm configuration | The distance metric | cosine; other values are dotProduct, euclidean, and hamming |
The default values are a reasonable starting point. You can tune them later based on your recall and latency requirements.
Step 4: Embed and upload the documents
Now we load the embedding model, create a small knowledge base, generate embeddings, and upload the documents to the index.
from azure.search.documents import SearchClient
from sentence_transformers import SentenceTransformer

search_client = SearchClient(
    endpoint=endpoint,
    index_name=index_name,
    credential=AzureKeyCredential(admin_key),
)

# Load the embedding model (produces 384-dimensional vectors)
model = SentenceTransformer("all-MiniLM-L6-v2")

# Our small knowledge base
documents = [
    {"doc_id": "1", "source": "billing-faq",
     "text": "You can update your payment method from the account settings page under Billing."},
    {"doc_id": "2", "source": "billing-faq",
     "text": "Refunds are processed within five to seven business days to the original payment method."},
    {"doc_id": "3", "source": "shipping-faq",
     "text": "Standard delivery takes three to five working days within the country."},
    {"doc_id": "4", "source": "account-faq",
     "text": "To reset your password, click the forgot password link on the login screen."},
    {"doc_id": "5", "source": "shipping-faq",
     "text": "International orders may take up to fourteen working days depending on customs."},
]

# Create embeddings for the text of each document
texts = [d["text"] for d in documents]
vectors = model.encode(texts)

# Attach the embedding to each document and upload
to_upload = []
for doc, vector in zip(documents, vectors):
    to_upload.append({
        "doc_id": doc["doc_id"],
        "source": doc["source"],
        "text": doc["text"],
        "embedding": vector.tolist(),
    })

result = search_client.upload_documents(documents=to_upload)
print("Uploaded", len(result), "documents.")
When you run this script, it will upload five small documents into the index. In a real project you would read documents from files or a database, split them into chunks, and upload thousands or millions of documents using the same upload_documents method, usually in batches.
Step 5: Search using a query vector
Now we write the retrieval function. We embed the user question with the same model, then we run a vector query. The VectorizedQuery object tells Azure AI Search which vector to search with, how many neighbours to return, and which field to search against.
from azure.search.documents.models import VectorizedQuery


def search(question, k=3):
    # Embed the question with the same model
    query_vector = model.encode([question])[0]

    vector_query = VectorizedQuery(
        vector=query_vector.tolist(),
        k_nearest_neighbors=k,
        fields="embedding",
    )

    results = search_client.search(
        search_text=None,                 # pure vector search
        vector_queries=[vector_query],
        select=["doc_id", "source", "text"],
    )

    output = []
    for r in results:
        output.append({
            "score": r["@search.score"],
            "source": r["source"],
            "text": r["text"],
        })
    return output


for item in search("how do I get my money back", k=3):
    print(round(item["score"], 4), "|", item["source"], "|", item["text"])
Notice that the question uses the words "get my money back", but none of the documents contain these exact words. The most relevant document talks about refunds. Because vector search compares meaning and not keywords, the refund document should appear at the top of the results. This is the behaviour we want in a RAG system.
Step 6: Build the RAG prompt
The retrieval part is now complete. The final step is to take the retrieved text and build a prompt for the language model. We do not call any specific model here, because you may use Azure OpenAI, an Anthropic model, an OpenAI model, or any other. We only prepare the input.
def build_prompt(question, k=3):
    hits = search(question, k=k)
    context = "\n\n".join(f"- {hit['text']}" for hit in hits)

    prompt = (
        "You are a support assistant. Use only the context below to answer "
        "the question. If the answer is not in the context, say that you do "
        "not have enough information.\n\n"
        f"Context:\n{context}\n\n"
        f"Question: {question}\n"
        "Answer:"
    )
    return prompt


print(build_prompt("how do I get my money back"))
The output is a prompt that contains the question and the most relevant pieces of text. You would now send this prompt to your language model, and the model would generate a grounded answer. This is the complete retrieval-augmented generation flow, with Azure AI Search acting as the vector store and retriever.
Using Azure OpenAI embeddings instead
In this tutorial we generated embeddings on our own machine. In many Azure projects, teams use Azure OpenAI embedding models instead, such as text-embedding-3-small. The change is small. You call the Azure OpenAI client to create the embedding, and you set the index dimensions to match the model (for example, 1536 for text-embedding-ada-002). The rest of the index and query code stays the same.
from openai import AzureOpenAI

client = AzureOpenAI(
    api_key="<your-azure-openai-key>",
    api_version="2024-10-21",
    azure_endpoint="https://<your-resource>.openai.azure.com/",
)

def get_embedding(text):
    response = client.embeddings.create(
        input=text,
        model="text-embedding-3-small",   # your deployment name
    )
    return response.data[0].embedding
Azure AI Search also supports a feature called integrated vectorization. With this feature, the service itself calls an Azure OpenAI model to convert text into vectors at indexing time and at query time, so you do not have to generate the embeddings in your own code. This is convenient for larger pipelines, but the basic flow shown above is enough to understand how vector search works.
A few practical notes
When you move from this small example to a real system, please keep the following points in mind. Choose your embedding model carefully, because it decides the dimension of your vectors and the quality of your retrieval. Add a chunking step so that long documents are split into focused passages. If you need both keyword matching and meaning-based matching, use hybrid search by passing a value to search_text together with the vector query; Azure AI Search will combine the keyword (BM25) results and the vector results. For even better ordering, you can enable the semantic ranker, which re-ranks the top results using a language model. Finally, monitor your index size, because vector indexes consume memory; if storage becomes a concern, look at vector compression and binary vectors.
Conclusion
We have seen what vector search is, why a RAG system needs it, and how Azure AI Search provides it through vector fields, the HNSW and exhaustive KNN algorithms, and the profile-based configuration. We then built a small but complete example: we created a search service, defined a vector index, embedded and uploaded a few documents, searched them by meaning, and assembled a RAG prompt. We also saw how to switch to Azure OpenAI embeddings.
You can now extend this example with your own documents, a chunking step, hybrid search, and a language model of your choice to build a full RAG application.
References
- Quickstart: Vector search in Azure AI Search — Microsoft Learn: https://learn.microsoft.com/en-us/azure/search/search-get-started-vector
- Create a vector index — Microsoft Learn: https://learn.microsoft.com/en-us/azure/search/vector-search-how-to-create-index
- Vector search overview — Microsoft Learn: https://learn.microsoft.com/en-us/azure/search/vector-search-overview
- Hybrid search overview — Microsoft Learn: https://learn.microsoft.com/en-us/azure/search/hybrid-search-overview
- Index binary vectors (memory optimization) — Microsoft Learn: https://learn.microsoft.com/en-us/azure/search/vector-search-how-to-index-binary-data
- azure-search-documents Python SDK — PyPI: https://pypi.org/project/azure-search-documents/
- Python vector search sample — Azure SDK for Python (GitHub): https://github.com/Azure/azure-sdk-for-python/blob/main/sdk/search/azure-search-documents/samples/sample_vector_search.py
- Azure AI Search vector samples — GitHub: https://github.com/Azure/azure-search-vector-samples